Quantcast
Channel: The Raspberry Pi Hobbyist
Viewing all 60 articles
Browse latest View live

Raspberry Pi Case From Wifi Router

$
0
0

You have most likely seen one of these somewhere before.

This case style is very common.  If you happen to get your hands on one, you can make a great case for the Raspberry Pi.

(Or, you can re-load the router firmware.  See dd-wrt.org for more information.)

I had two in my huge pile of junk, so I though I'd have some fun. This was literally a ten minute project.


The case pops apart easily, if you know the trick.  Grab the blue front part and pull apart from the rear part.  After that, the top and bottom will come apart. A couple of screws later and you have prime case material.


I drilled two holes to mount the Pi and trimmed the rear opening just a little. It needs a better power connector.


One good thing about these cases, they stack very nicely.

Now to search the pile of junk for a hard drive. There is enough room to add one in this case.


Works Great!


Wifi Router Case Mod

$
0
0
In my previous post I showed how to use the case from an old LinkSys router as a case for a Raspberry Pi.  Today I decided that it needed a little improvement.  Bring on the blinking lights.  Isn't everything better with blinking lights?

I showed in the posts Server Box with Utilization Displays and CPU and I/O Utilization Display - Details how to use LEDs for a utilization display.  This project is a little smaller scale - only six LEDs instead of twenty.


The circuit is very simple.  The positive lead to each LED is connected to a resistor.  All of the resistors are connected to 5V.  The negative lead of each LED is connected to a GPIO pin.  A low signal on the GPIO pin turns the LED on.

This inverts the logic, but that can be handled in software.  This has the benefit of being able to push more current through the LEDs than would be possible if the GPIO line was connected to the positive lead of the LED.


This PCB layout shows a close approximation of how I made the circuit.  I didn't make a printed circuit board, but I have been designing some for work this week, so I did this drawing using PCB Artist.  I definitely plan to create some PCBs for my Pi hobby, once I decide what to make next.


All the wires are connected directly to a ribbon cable. I created a real power plug while I was at it.

The LED circuit is pushed into the front part of the case and through some holes that I drilled.  It is held in place by friction and a little tape.


My latest Raspberry Pi creation is stacked with the modem and router with all their blinking lights.

Now maybe it will not feel inadequate.


My New System Checklist

$
0
0
I recently had need to create a new Raspbian system for a project and decided to record all the things I did after the system image first boots. Frequently, I forget one or two of these, so this will become a checklist that I follow when I create a new system.

There are many guides to creating a system for the Raspberry Pi and this post is not an attempt to create another. I am putting this here for my own reference as much as to share.  To make it helpful to beginners, I have added some explanations.  You may prefer nano over vi as the file editor.

Please feel free to use the comments section to let people know what customization you like to make for your Pi systems.

Load image as usual
raspi-config runs first time
- expand file system
- Internationalization -> set locale -> TZ = US-Eastern
- Internationalization -> Keyboard = English(US)
- advanced -> hostname (RasPi-##-Purpose)
- advanced -> mem split 16 for GPU
- advanced -> enable SPI and I2C and Serial
reboot, and log in as pi (raspberry)

CPU overclocking would also be set up in raspi-config, but I haven't had any need to do this.

All of the following commands require root privilege.  You can either put sudo before each command or enter sudo -i and run a shell as root.

Create a new user for myself, give it sudoer privilege.
adduser ted 
echo "ted ALL=(ALL) NOPASSWD: ALL">>/etc/sudoers

Update the package database and upgrade all installed packages.
apt-get update 
apt-get upgrade

Install some new packages.
apt-get install samba screen libmysqlclient-dev libi2c-dev

Configure Samba (Windows file sharing)
vi /etc/samba/smb.conf
uncomment "socket options = TCP_NODELAY"
delete all shares and add:
[opt]
   comment = opt
   writable = yes
   locking = no
   path = /opt
   public = yes

Restart the Samba service
service samba restart  

Edit the SSH server config.  Turning off DNS reverse lookups will speed up the connection process when to log in through SSH.
vi /etc/ssh/sshd_config
add "UseDNS no"

Edit the netwrok configuration and set static IP address and wifi config.  The interface name for the wifi will be used below in the supplicant file.
vi /etc/network/interfaces
iface eth0 inet static
   address 192.168.0.51
   netmask 255.255.255.0
   gateway 192.168.0.1
   
iface home inet static 
   address 192.168.0.53
   netmask 255.255.255.0
   gateway 192.168.0.1

Edit the wifi supplicant file.  The "id_str" setting connects back to the name used above.
vi /etc/wpa_supplicant/wpa_supplicant.conf
network={
        id_str="home"
        ssid="NOTMYSSID"
        psk="NotMyPassword"
        proto=WPA
        key_mgmt=WPA-PSK
        pairwise=TKIP
        auth_alg=OPEN
}

Install Gordon's WiringPi library.  I use this extensively in my C programming.
cd ~
git clone git://git.drogon.net/wiringPi
cd wiringPi
git pull origin
./build
gpio -v
gpio readall

Edit the kernel module configuration to enable SPI, I2C, and 1-Wire.
vi /etc/modprobe.d/raspi-blacklist.conf
uncomment SPI and I2C devices

vi /etc/modules
add this
# SPI devices  
spi-dev  
# I2C devices  
i2c-dev  
i2c_bcm2708
# 1-Wire devices  
w1-gpio  
# 1-Wire thermometer devices  
w1-therm  

Finally, reboot the system again.  Then log on as the new user you created and  remove the default user.
userdel pi

If you don't do this last step and your system is accessible from the internet, then it will not be long (sometimes only hours or minutes) before a hacker finds it and does bad things.  My firewall log shows constant attempts to brute force a login via SSH and "pi" is a common user name that is tried.


Raspberry Pi Weather Station

$
0
0
My latest Pi project involves creating a weather station in a way very different from most others. I will cover various parts of this project in my next several posts.
The weather station completed and mounted outdoors.
The  most common way that a Raspberry Pi (or any other computer) is interfaced is via a pre-built system that has a serial or USB connection. This is the fastest and easiest way to do this. But what fun is doing things the way everyone else does?

I had an old weather station that was relatively cheap (less than $100) and did not have any drivers for Linux. I ran it on an old PC for several years, but it finally stopped working. The wireless part was never very reliable and it was a pain to keep replacing batteries. I was able to salvage the anemometer (wind speed) and rain gauge and hack them into my new system.

For temperature and humidity readings I use the AM2315 from adafruit. For barometric pressure I use the MPL115A2, also from adafruit. Both of the devices interface via the I2C bus. I have to give a plug for adafruit. It's a great place to get parts to connect to the Raspberry Pi.

The interface board and Pi on a mounting plate.
The anemometer and rain gauge are simple contact closure interfaces. Each tiny bucket of rain and each rotation of the anemometer produce a single pulse. These are connected simply through GPIO pins and drive interrupts which count the pulses.

The interface board that connects to the Pi is actually very simple. It mostly just passes GPIO pins to screw terminals. The MPL115A2 is the tiny blue board next to the ribbon connector.


Adafruit also provided the perfect weatherproof enclosure. I will have to drill holes to feed wires in, but those will be sealed with silicone.


In the near future I will write up posts on some of the problems I had to overcome to complete this project.
  • Handling GPIO interrupts
  • Interfacing to the AM2315 via I2C
  • Interfacing to the MPL115A2 via I2C
  • Calibrating the rain and wind sensors
  • Logging to my MySQL database server
  • Logging to Weather Underground
  • Providing a nice web interface to display the weather data
Also, I will post my source code for others to use and/or learn from.

This has been a very fun project and I expect to use the weather station for many years to come.

Of course, Murphy had to strike - when I went to mount the system outdoors, it was raining!


GPIO Interrupts using WiringPi

$
0
0
My weather station has two devices that send simple pulses to the Raspberry Pi. The rain gauge pulses each time its "bucket" fills and the wind speed gauge pulses for each rotation. The best way to handle this is by using interrupts.

An interrupt is a signal to the computer to stop what it is doing and do something else.  These are used extensively by the operating system, but an application can use them as well.  If you have a GPIO input that needs to be responded to, you could poll the GPIO pin in a loop waiting for it to change, but this can be unreliable for very brief state changes. It is also wasteful of the CPU.  The better way is to assign an interrupt that will be activated when the GPIO pin changes state.

I code all my projects in C and use Gordon's WiringPi API.  This library makes it much easier to use GPIO.  Interrupts are now supported using the wiringPiISR function.  (The waitForInterrupt function is deprecated and should not be used.) Using interrupts takes only three steps:

  • Create a function to be called when the GPIO pin changes state. This must be defined like this: void myInterrupt(void)
  • Initialize the WiringPi library by calling wiringPiSetup
  • Call wiringPiISR to configure the interrupt

You can choose to have your interrupt called when the pin goes low, goes high, or both (INT_EDGE_FALLING, INT_EDGE_RISING, INT_EDGE_BOTH)

My interrupts simply increment a global variable. The value of this variable is then checked periodically (typically once per second) and the count is converted into the appropriate units for the device.

An example of how to use an interrupt is shown below.

#include <stdio.h>
#include <string.h>
#include <errno.h>
#include <stdlib.h>
#include <wiringPi.h>

// Use GPIO Pin 17, which is Pin 0 for wiringPi library

#define BUTTON_PIN 0

// the event counter
volatile int eventCounter = 0;

// -------------------------------------------------------------------------

void myInterrupt(void) {
eventCounter++;
}

// -------------------------------------------------------------------------

int main(void) {
// sets up the wiringPi library
if (wiringPiSetup () < 0) {
fprintf (stderr, "Unable to setup wiringPi: %s\n", strerror (errno));
return 1;
}

// set Pin 17/0 generate an interrupt on high-to-low transitions
// and attach myInterrupt() to the interrupt
if ( wiringPiISR (BUTTON_PIN, INT_EDGE_FALLING, &myInterrupt) < 0 ) {
fprintf (stderr, "Unable to setup ISR: %s\n", strerror (errno));
return 1;
}

// display counter value every second.
while ( 1 ) {
printf( "%d\n", eventCounter );
eventCounter = 0;
delay( 1000 ); // wait 1 second
}

return 0;
}

All of the code from my weather station can be found at
https://code.google.com/p/raspberry-pi-hobbyist/source/browse/

You can also get it using git:
git clone https://ted.b.hale@code.google.com/p/raspberry-pi-hobbyist/

Log Data to the Weather Underground

$
0
0
The next topic for my weather station system is how to send your data to a "Personal Weather Station" on the Weather Underground web site. This provides a nice interface for the world to see your current (and past) conditions.

The PWS Overview explains what personal weather stations are. It also has a buying guide. For comparison, the total cost for my system was somewhere around $150 (That's just a very rough guess.)

See PWS Upload Protocol for the complete documentation for uploading data for a PWS. To summarize, you need to send a properly formatted string to a web address (a simple HTTP GET to a PHP script.)

So here is a simplified example of the code that I am using.

/***********************************************************************
Filename: wunderground.c
send current conditions to my Personal Weather Station on
The Weather Underground

Uses libcurl to send the data via HTTP

build with:
gcc -o wutest wunderground.c -L/usr/local/lib -L/usr/local/ -lcurl -lwiringPi

23-Jan-2015 Ted Hale created this as an example for blog

************************************************************************/

/* system includes */
#include <stdio.h>
#include <stdlib.h>
#include <stdarg.h>
#include <time.h>
#include <string.h>
#include <curl/curl.h>

#define TRUE 1
#define FALSE 0

// these are normally global varables that my weather system updates
// just put them here for this example
float outsideTemp;
float windSpeed;
float windGust;
float rainPeriod;
float humidity;
float barometric;

// my PWS ID and password
char *myStationID = "KVAWILLI99";
char *myStationPassword = "NOTMYPASSWORD";

// structure used by the libcurl write callback function
struct url_data {
size_t size;
char* data;
};

//=====================================================================
// write callback function needed by libCurl
size_t write_data(void *ptr, size_t size, size_t nmemb, struct url_data *data) {
size_t index = data->size;
size_t n = (size * nmemb);
char* tmp;

data->size += (size * nmemb);
tmp = realloc(data->data, data->size + 1); /* +1 for null terminator */

if(tmp) {
data->data = tmp;
} else {
if(data->data) {
free(data->data);
}
printf("skynet_post Failed to allocate memory.\n");
return 0;
}

memcpy((data->data + index), ptr, n);
data->data[data->size] = '\0';

return size * nmemb;
}

//=====================================================================
// upload current conditions to Weather Underground
int UpdateWunderground()
{
// URL format
char *myFmt = "http://weatherstation.wunderground.com/weatherstation/updateweatherstation.php?"
// 1 2 3 4 5 6 7 8
"ID=%s&PASSWORD=%s&dateutc=%04d-%02d-%02d+%02d%%3A%02d%%3A%02d"
// 9 10 11 12
"&windspeedmph=%f&windgustmph=%f&tempf=%f&rainin=%f"
// 13 14
"&baromin=%f&humidity=%f&action=updateraw";

/* 1 ID
* 2 passwd
* 3 yr
* 4 mon
* 5 day
* 6 hr
* 7 min
* 8 sec
* 9 winspeed
* 10 gusts
* 11 Outdoor temp
* 12 rain
* 13 baro
* 14 humidity
*/

int error = TRUE;
time_t now;
struct tm *dt;
int hour,minute,second,year,month,day;
char url[1024];

CURL *curl;
CURLcode res;
struct url_data response;

time(&now);
dt = gmtime(&now);

// build the URL string
// 1 2
snprintf(url, sizeof(url)-1, myFmt, myStationID, myStationPassword,
// 3 4 5 6 7 8
dt->tm_year, dt->tm_mon, dt->tm_mday, dt->tm_hour, dt->tm_min, dt->tm_sec,
// 9 10 11 12 13 14
windSpeed, windGust, outsideTemp, rainPeriod, barometric, humidity);

// guarantee null termination of string
url[sizeof(url)-1] = 0;

curl = curl_easy_init();
if (curl) {
response.size = 0;
response.data = malloc(4096); /* reasonable size initial buffer */
response.data[0] = '\0';
curl_easy_setopt(curl, CURLOPT_URL, url);
curl_easy_setopt(curl, CURLOPT_CUSTOMREQUEST, "GET");
curl_easy_setopt(curl, CURLOPT_WRITEFUNCTION, write_data);
curl_easy_setopt(curl, CURLOPT_WRITEDATA, &response);
res = curl_easy_perform(curl);
if(res != CURLE_OK)
{
printf("curl_easy_perform() failed: %s\n",curl_easy_strerror(res));
error = TRUE;
} else {
error = (strcmp(response.data,"Success") != 0);
}
curl_easy_cleanup(curl);
free (response.data);
} else {
printf("curl_easy_init failed\n");
error = TRUE;
}

return error;
}

int main()
{
// set some dummy data
outsideTemp = 69.7;
windSpeed = 2.3;
windGust = 5.6;
rainPeriod = 0.001;
humidity = 75.0;
barometric = 31.5;

UpdateWunderground();

return 0;
}

Please let me know if you use this code.  I would like to hear how it works for you.

Using the AM2315 Temperature/Humidity Sensor

$
0
0
This post is a continuation of my series on the weather station that I built.  On e of the sensors that it uses is the AM2315 temperature/humidity sensor

The AM2315 is very poorly documented.  This leads to several problems when attempting to use it. Thankfully, Sopwith has provided details of his experience with this device http://sopwith.ismellsmoke.net/wp-content/uploads/2014/03/PI-How-To-AM2315.pdf so we can move on more quickly to making use of it. Sopwith provides a more detailed explanation of how to set up and use this device. If you are using Python, then you must read his article, since he explains some additional problems caused by the way the Python library works.

The first problem you will run into is that it doesn't show up on the i2c bus. That is because the device stays in sleep mode until it is woken up to prevent generating heat that would affect the humidity sensor accuracy. If you run the command i2cdetect twice quickly, then the second time it will show up.

The second problem is that the i2c address is wrong in the datasheet. It is no longet at 0xB8, but is instead at 0x5c. This is not a big problem since you will see the correct address show up in the second i2cdetect results.

The third problem is really a side effect of the first - the device does not keep updated values in registers like most i2c devices. You will have to issue a read request command and then read the response.

Even though I use the i2c support provided by the WiringPi library, it is best to do raw reads and writes to the device because it does not follow the i2c standard very well. This is the sequence to follow:

  • Write a zero byte to it twice to wake it up
  • Write a read request to make it update the temperature and humidity values
  • Read the response to the read request
  • Do some manipulations on the data to get the values in degress Celcius and %RH


Here is an example program in C with comments that give more detailed explanation.

/*
example code to test am2315 (temp/humid sensor) on i2c bus
ted.b.hale@gmail.com
*/

#include <unistd.h>
#include <sys/types.h>
#include <sys/stat.h>
#include <fcntl.h>
#include <stdio.h>
#include <stdint.h>
#include <wiringPi.h>
#include <wiringPiI2C.h>

int main(int argc, char *argv[])
{
int n, fd;

// read request - 3 is the read register command
// 0 is the address to start at
// 4 is the number of bytes to read
unsigned char read_request[3] = {3, 0, 4};

// buffer for the response: command byte, length byte, 4 bytes data, 2 bytes of checksum
unsigned char response[8];

// dummy data sent to wake up device
unsigned char dummy[1] = {0};

// the final results
float humidity, celsius;

// open the am2315 device using WiringPi
// 0x5C is bus address of am2315
// fd is the "file descriptor" used in later read and writes
fd = wiringPiI2CSetup(0x5c);
if (fd==-1)
{
printf("wiringPiI2CSetup failed\n");
return 0;
}

// run until killed with Ctrl-C
while (1)
{
// send some data to wake it up
n = write(fd, dummy, 1);

// send the read request
n = write(fd, read_request, 3);
printf("write returned %d bytes\n",n);

// very short delay to allow device to do data conversion
delay(2);

// read the reaponse
n = read(fd, response, 8);
printf("read returned %d bytes\n",n);

// sanity check on data returned
// first byte should echo the read requst byte (3)
// second byte should indicate 4 bytes of data returned
// I don't bother verifying the checksum
if ((response[0]!=3) || (response[1]!=4))
{
printf("i2c response invalid\n");
for (n=0; n<8; n++)
printf("%02x ",response[n]);
}
else
{
// (high byte * 256) + low byte
// divide by 10
humidity = (256*response[2] + response[3])/10.0;

// same as above but mask out the sign bit on the high byte
celsius = (256 * (response[4] & 0x7F) + response[5]) / 10.0;
// make result negative if the sign bit is set
if ((response[4]&0x80)!=0)
celsius *= -1.0;

printf(" humidity = %5.1f%%\n",humidity);
printf("temperature = %5.1f\n",celsius);
}
printf("\n\n\n");

// wait two second and loop again
delay(2000);
}

return 0 ;
}
The AM2315 is supposed to be a very accurate device, but after using it a while, I am very suspicious of the humidity values.  The plots of my data show the humidity doing things that are not possible. I suspect that it sometimes gets saturated with moisture from fog, dew or rain and then it reads 100% for a long time. Mine is mounted so that it is directly exposed to the outside environment. Best practice says that I should have a radiation shield protecting the temperature sensor from direct sunlight. I plan on creating one for the AM2315 and this may also allow the humidity sensor to be more accurate.

Using the MPL115A2 to read Temperature and Barometric Pressure

$
0
0
This post is a continuation of the series on my weather station system.

My weather station uses the MPL115A2, available from Adafruit.  It is an inexpensive sensor for measuring temperature and barometric pressure.  It is only moderately accurate - the MPL3115A2, which only slightly more expensive, would probably have been a better choice.  Both sensors are interfaced using an I2C bus and are fairly simple to use.

In order to compute the correct pressure, several coefficient values must be read from the device first.  These coefficients are unique to each device and provide the calibration necessary to arrive at an accurate reading.  Since they don't change, they only need to be read once.

After reading the coefficients, the data capture and conversion are started by writing a zero to register address 0x12.  The program must then pause briefly to allow the conversion to complete.  The results are stored in the device registers and are read with the standard I2C commands.  The temperature value is taken directly from the register values, with some simple adjustments to get it to degrees Celsius.  The pressure is then computed by a formula that applies the coefficients read earlier as well as the temperature.  The value is in kilo Pascals.  For use by an American like myself, these are finally converted to degrees Fahrenheit and inches of Mercury.

Below is an example, in C, of the code similar to what I use.

/*
example to test mpl115a2 (temp/baro sensor) on i2c
ted.b.hale@gmail.com
*/

#include <unistd.h>
#include <sys/types.h>
#include <sys/stat.h>
#include <fcntl.h>
#include <stdio.h>
#include <stdint.h>
#include <wiringPi.h>
#include <wiringPiI2C.h>


int main(int argc, char *argv[])
{
int i, n, fd;
// command string to get coefficients
unsigned char coef_request[3] = {3, 4, 8};
// command string to request conversion
unsigned char conv_request[3] = {0, 0x12, 0};
// variables for the final results
float baro, celsius, farenheit;

// variables to hold the integer values of coefficients
int16_t a0coeff;
int16_t b1coeff;
int16_t b2coeff;
int16_t c12coeff;
// variables to hold the floating point coefficients
float a0;
float b1;
float b2;
float c12;
// some intermediate values
int pressure, temp;
float pressureComp;

// open a file descriptor to the device on the I2C bus
fd = wiringPiI2CSetup(0x60); // 0x60 is bus address of mpl115a2
if (fd==-1)
{
printf("wiringPiI2CSetup failed\n");
return 0;
}

// get the coefficients. This only needs to be done once.
// Note on C language: the << and >> operators perform bit shifting
a0coeff = (( (uint16_t) wiringPiI2CReadReg8(fd,4) << 8) | wiringPiI2CReadReg8(fd,5));
b1coeff = (( (uint16_t) wiringPiI2CReadReg8(fd,6) << 8) | wiringPiI2CReadReg8(fd,7));
b2coeff = (( (uint16_t) wiringPiI2CReadReg8(fd,8) << 8) | wiringPiI2CReadReg8(fd,9));
c12coeff = (( (uint16_t) (wiringPiI2CReadReg8(fd,10) << 8) | wiringPiI2CReadReg8(fd,11))) >> 2;
printf("%d %d %d %d\n",a0coeff,b1coeff,b2coeff,c12coeff);
// convert coefficients to floating point
a0 = (float)a0coeff / 8;
b1 = (float)b1coeff / 8192;
b2 = (float)b2coeff / 16384;
c12 = (float)c12coeff;
c12 /= 4194304.0;
printf("%f %f %f %f\n\n",a0,b1,b2,c12);

// start conversion and wait a tiny bit
wiringPiI2CWriteReg8(fd,0x12,0);
delay(5);

// get the results by reading the device registers
pressure = (( (uint16_t) wiringPiI2CReadReg8(fd,0) << 8) | wiringPiI2CReadReg8(fd,1)) >> 6;
temp = (( (uint16_t) wiringPiI2CReadReg8(fd,2) << 8) | wiringPiI2CReadReg8(fd,3)) >> 6;

// compute temperature compensation for pressure
pressureComp = a0 + (b1 + c12 * temp ) * pressure + b2 * temp;

// get the pressure in kiloPascals
baro = ((65.0F / 1023.0F) * pressureComp) + 50.0F; // kPa
// get the temperature in celsius degrees
celsius = ((float) temp - 498.0F) / -5.35F +25.0F; // C

// convert kilo-Pascals to inches of mercury
baro = baro * 0.295299830714;
// convert Celsius to Farenheit
farenheit = (celsius * 1.8) + 32.0;

//show the results
printf("%f %f\n\n",baro,farenheit);

return 0;
}

The device comes with a 6x1 header which allows it to be mounted simply on a circuit board.  I mounted it directly on the interface board that I built for the weather station.  This is in a weatherproof enclosure, but that should have negligible effect on the reading of  pressure since the enclosure is not completely air-tight.  This will, however, affect temperature reading.  Therefore, while I do record the temperature value, it is not the primary source for temperature that my weather station uses.  For that I use the AM2315 sensor, which is described in my previous post.

New Raspberry Pi GPIO Pinout Diagram

$
0
0
Since I have been using model B+ and model 2 a lot lately, I wanted an updated GPIO pinout diagram. Also, since I used WiringPi, the diagram had to include that numbering scheme. None of the diagrams I found satisfied me, so I made my own. I used the output from the WiringPi command gpio readall and did some formatting in excel to produce the following diagram. I hope you find it useful.


Fermentation Detector

$
0
0
This is a follow up to my posts on automated home brewing:
Automated Home Brewing
and
Improved Home Brewing Controller

In the second post I mentioned that I would be adding a "bubble detector" to my interface. Now I have finally gotten the time to do it and am using it to monitor the fermentation stage of a lager. This sensor detects bubbles in the air lock and if you have ever seen an airlock in action you will understand why I call this a "bloop-ometer."

The sensor uses this photo interrupter with a simple circuit to trigger an interrupt on the Raspberry Pi which records how many bubbles per minute are produced. The photo interrupter has a gap with an infrared LED on one side and an infrared sensor on the other. Voltage is provided to the output pin until an object enters the gap and breaks the infrared beam.

In this case the object to block the beam is a small amount of water which is mostly transparent to infrared.  To overcome this the circuit has a potentiometer to adjust the voltage applied to the LED. It must be adjusted down until the sensor is just on the edge of triggering.  In this configuration, the water will block the infrared enough to trigger the device, but when a bubble passes, the infrared can pass.

The circuit is very simple - an interrupter and a potentiometer is all that is really needed. To make it easier to adjust, I added a red LED. I also added an inverter since the output from the sensor is not enough to drive an LED and trigger the Pi. The potentiometer that I used was 5K ohms and I added an additional 100 ohms for safety. If you use less than 100 ohms then too much current will flow into the LED and it will die. (I know this from experience.)

Here is the pinout for the GP1A57HRJ00F.

And here is the circuit as I built it.


And finally, a video of it in action.


Another Linksys Case Mod for a Pi

$
0
0
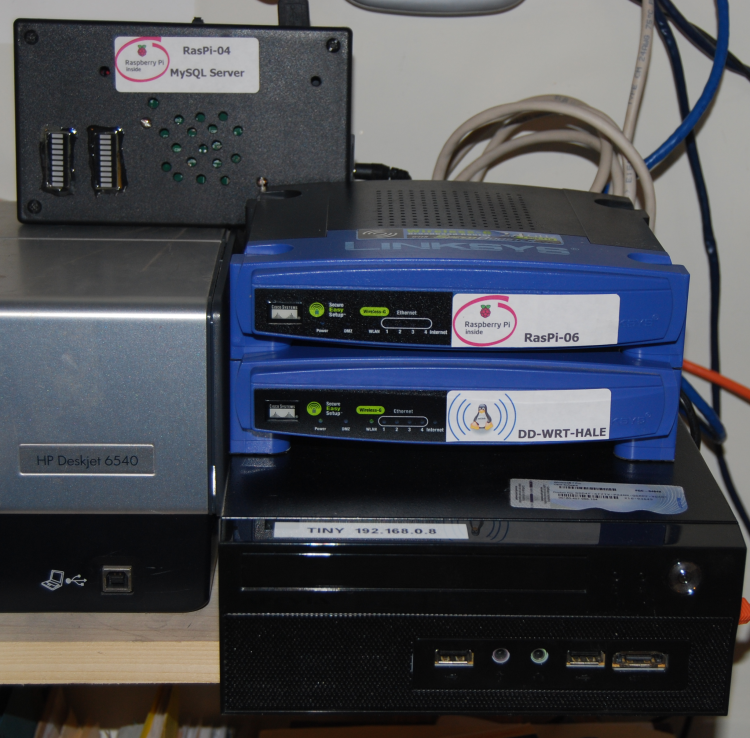
I have rebuilt my MySQL server system using a Pi version 2 and a new external hard drive. I did this one in a Linksys router case. These cases are really easy to work with and not hard to come by.

I skipped the USB hub on this build.  There isn't enough room and I found an easier way. Power is spliced directly into a usb cable from a connector on the rear of the case. I found that this would not backfeed the Pi like I expected. (This does work on some of my older Pi systems.) To overcome this, I added a wire feeding 5V into GPIO pin #2.

The Raspberry Pi is mounted on the base of the case with the USB and network connectors facing the rear. The rear has to be trimmed a little for the connectors to be clearly accessible.

The hard drive is mounted onto the top of the case. The USB cable has to exit the case and to plug in the the Pi.

In the process of building this, I updated the instructions on how to run from an external hard drive.

This case mod makes a neat little case that stacks nicely. Here it is stacked with my cable modem and firewall. (The firewall is a Pi too!)


New Utilization Display

$
0
0
In my last post I showed the new case for my MySQL server. The original case had two 10-segment LED bar graph displays that showed CPU and disk utilization. Now I have added a similar display onto the new case.


I chose to only display CPU usage but after I do some testing, I may change it to show disk I/O instead. This is a simple change to the configuration file of the utilization app. One issue with showing CPU is that the Pi 2 has four CPUs and typically only one will be maxed out. In the image above two of the CPUs are maxed out so the utilization shows 50 percent. The most I normally see is 25 percent since I seldom have more that one client querying the database.

The hardware used is very straightforward. I used a MCP23017 GPIO extender with ten of its pins wired directly to the LEDs. This chip uses an I2C bus connection so it only requires four pins on the Pi - power, ground, SDA, and SCL.


A couple of notes on the build:

1 - a resistor network would have been much neater than 10 separate resistors. I didn't have one handy but I do have a huge amount of single resistors.

2 - don't use ribbon cable. Just don't. It looks nice but it is normally used with press on connectors and is not intended for soldering. As soon as you touch the soldering iron to the wire an inch of the insulation melts away. Even with my super nice soldering iron turned to the minimum setting it was a pain to use. I won't make that mistake again.

If you want to use my code for the utilization display, I will be putting it on github. Check the comments for the address.

HDC100x Temperature/Humidity Sensor

$
0
0
Humidity is notoriously difficult to measure accurately. And now I have found that humidity sensors are very fickle. I had been using the AM2315 sensor, which Adafruit clearly states is not weatherproof. I can attest that it is definitely not. It worked OK for a few months, although it did have a problem when it rained. After rain, it would show 100% humidity for a few days until it dried out. Finally a couple of months ago, it died completely.

I have now installed an HDC1008 sensor. This device uses an I2C interface and has a very simple protocol. There is some sample code below.
To get a reliable temperature reading from any sensor it should be placed in a shroud that provides shade and good ventilation. I mounted the HDC1008 inside the shroud from my old weather system. This will protect it from the weather and prevent a spike in temperature reading when the sun hits it.


Accuracy Issues

The image below shows a plot of temperature for an entire day. The HDC1008 is the top line and the bottom line is a DS18B20 one-wire temperature sensor.

There are two things easily noticeable - First, there is a two degree difference in the sensors. I placed my laboratory thermometer next to these sensors for several minutes to get an accurate reading of the true temperature. It was exactly in between the two sensors, so one is one degree low and the other is one degree high. The DS18B20 specifications say it has an accuracy of ±0.5°C which is 0.9°F, so this reading is only a little outside its claimed accuracy. The HDC1008 claims an accuracy of ±0.2°C which is 0.36°F, but mine shows a difference of 0.9°F.

The second thing to notice in the plot below is how wavy the top line is. The reading from the HDC1008 often fluctuate by a degree or more in a very short period. My software takes twenty readings per minute and averages them. This data is recorded each minute. This averaging does not smooth out the plot so I have to conclude that the readings from the HDC1008 really are changing like the plot shows.

Conclusions

Neither of the sensors discussed are going to provide laboratory level accuracy, but I wouldn't expect that from a low cost device. Both are fine for typical home weather monitoring. I use the DS18B20 on several other devices and prefer it because it is very low cost and very simple to use.

I have no way to measure the accuracy of the humidity readings from the HDC1008, but they seem to correlate well with nearby weather stations. My overall impression of the device is positive and I find it considerably better than the AM2315 that it replaced.

Code

Below is sample code that I used to initially test the device. This was adapted from the library for arduino provided by Ladyada.  Many thanks to her and the other folks at Adafruit. 

/*************************************************** 
sample code for the HDC1000 Humidity & Temp Sensor
by ted.b.hale@gmail.com
2015-08-28

adapted from Adafruit_HDC1000 library, license follows:

Designed specifically to work with the HDC1000 sensor from Adafruit
----> https://www.adafruit.com/products/2635

These sensors use I2C to communicate, 2 pins are required to
interface
Adafruit invests time and resources providing this open source code,
please support Adafruit and open-source hardware by purchasing
products from Adafruit!

Written by Limor Fried/Ladyada for Adafruit Industries.
BSD license, all text above must be included in any redistribution
****************************************************/

#include <errno.h>
#include <stdio.h>
#include <stdarg.h>
#include <string.h>
#include <stdlib.h>
#include <stdint.h>
#include <unistd.h>
#include <sys/types.h>
#include <arpa/inet.h>
#include <wiringPi.h>
#include <wiringPiI2C.h>

#define HDC1000_I2CADDR 0x40
#define HDC1000_TEMP 0x00
#define HDC1000_HUMID 0x01
#define HDC1000_CONFIG_MODE (1 << 12)
#define HDC1000_CONFIG_RST (1 << 15)
#define HDC1000_CONFIG_TRES_14 0
#define HDC1000_CONFIG_HRES_14 0
#define HDC1000_MANUFID 0xFE
#define HDC1000_DEVICEID 0xFF


uint16_t i2c_read16(int fd, uint8_t outbyte)
{
uint16_t retval;
write(fd, &outbyte, 1);
delay(50);
read(fd, &retval, 2);
return ntohs(retval);
}

uint32_t i2c_read32(int fd, uint8_t outbyte)
{
uint32_t retval;
write(fd, &outbyte, 1);
delay(50);
read(fd, &retval, 4);
return ntohl(retval);
}

int HDC1000_Init(uint8_t addr)
{
uint32_t x;
int fd = wiringPiI2CSetup(addr);
if (fd==-1)
{
printf("wiringPiI2CSetup for hdc1000 failed\n");
return -1;
}

// reset, and select 14 bit temp & humidity
uint16_t config = HDC1000_CONFIG_RST | HDC1000_CONFIG_MODE | HDC1000_CONFIG_TRES_14 | HDC1000_CONFIG_HRES_14;

write(fd, &config, 2);
delay(15);

x = i2c_read16(fd,HDC1000_MANUFID);
if (x != 0x5449)
{
printf("HDC1000_MANUFID returned %4X\n",x);
return -1;
}
x = i2c_read16(fd,HDC1000_DEVICEID);
if (x != 0x1000)
{
printf("HDC1000_DEVICEID returned %4X\n",x);
return -1;
}

return fd;
}


float HDC1000_readTemperature(int fd)
{
float temp = (i2c_read32(fd,HDC1000_TEMP) >> 16);
temp /= 65536;
temp *= 165;
temp -= 40;

return temp;
}


float HDC1000_readHumidity(int fd)
{
float hum = (i2c_read32(fd, HDC1000_TEMP) & 0xFFFF);

hum /= 65536;
hum *= 100;

return hum;
}


int main()
{
int fd;
float x;

fd = HDC1000_Init(HDC1000_I2CADDR);
if (fd==-1)
{
printf("HDC1000_Init failed\n");
return 0;
}

x = HDC1000_readTemperature(fd);
printf("\n temperature = %4.1f degC %4.1f degF\n",x,((x*9)/5)+32);

x = HDC1000_readHumidity(fd);
printf(" humidity = %4.1f%%\n\n",x);

return 0;
}

Improved Alarm/Automation System

$
0
0

A Little History

I have been fascinated (some would say obsessed) with home automation for many years. I even had a paper published on the subject in 1978, so I experimented with many options before the Raspberry Pi came along. My first working system was based on an Atari 400. I then went through several versions based on microprocessors (like an Arduino, but much older and more primitive) but was never happy with their limitations. Eventually I was able to obtain an old PC and use parallel printer ports for digital I/O. I experimented with Linux and Windows versions and found Linux to be much better suited for what is essentially an embedded system.

The Pi Comes Along

Of course, the first project that I took on when I started working with the Raspberry Pi was a replacement for my PC based home alarm and automation system. The requirements were straight-forward:
    ● several inputs for motion detectors and door/window sensors
    ● several relay outputs for control of miscellaneous devices 
    ● serial (RS-232) port for connecting to an X10 interface
    ● socket interface for control from other computers
    ● logic to provide some limited intelligence
I describe this first version in a series of my early blog posts. Look at Sept. and Oct. 2012 to see these.

Time for an Update

Updated Alarm/Automation System
In the several years that I have worked with the Raspberry Pi I have learned a lot about the best way to do some things and applied these lessons to my updated alarm/automation system. I think the most important lesson that I learned was to make things as modular as possible. It is inevitable that I will screw up something and if the project is one large circuit board, then I may well have to scrap it and start over. However, if I break that into several smaller boards, then a screw-up will, at most, cause the rebuild of a single small circuit. Some systems fit this designs method very well while some just can not be broken up. The alarm/automation system fits this method well and consists of the following parts:
    ● Raspberry Pi (of course)
    ● Simple "hat" for the Pi to expose all the buses needed
    ● a relay board (bought, not built)
    ● control board for the relay
    ● control board for digital inputs
Each of these is described below.


The "Bus Hat"

The Bus Hat
In order to connect the various pieces to the Pi, I needed a way to access some of the buses available. I created what I call a "bus hat" to do this. This mounts on top of the Pi and provides access to the following:
    ● the I2C bus
    ● the SPI bus
    ● the 1-Wire bus
    ● RS-232 converted to proper levels
    ● 5V input to power it all
I knew that I would be using 3.3V devices, so I did not include any level converters on the I2C or SPI buses.  I did need proper voltage levels for the RS-232 serial line and that was provided by a MAX3232 chip. 

This is a very simple device since all it really does is connect specific GPIO pins to connectors for the required buses.


Bus Hat Circuit Design
My design for this bus hat is shown here. You may notice that this is a little different than most circuit diagrams you will see. I am a little embarrassed to admit that I use Power Point to create these drawings. I am mostly concerned with how the components will be laid out on the perf board, so I make a perf board grid the background image and place the components onto that and add the wiring. Power Point makes this quick and easy. If you need to make a simple and better looking wiring diagram I recommend the Fritzing app. For real PCB drawings I have used Eagle and PCB Artist.

Relay Board

Relay Board

I decided to buy a relay board online. There are quite a few of these available and the price is hard to beat. You should be able to find an 8 channel board like this for well under $10. There is no way I could even buy the components for that cheap.


Relay Control
Relay Control Circuit

To control the relays I needed 8 GPIO lines. The perfect job for the MCP23008 GPIO extender. This chip connects via I2C (there is also an SPI version) and provides 8 GPIO lines. I set them all as output and connect one to each relay control pin. One thing to be aware of - these relays require more power to operate than the Pi can generally provide. They will appear to work at first but then you try to turn on all 8 relays and the Pi will reboot due to the drop in power. The relay board will provide a pin for connecting external power to prevent this from happening. Since I was using 3.3V on the I2C bus, I added a 5V input to the relay controller to provide this power.

Input Board

Input Board Circuit
The input board provides 16 "contact closure" inputs. In other words, a switch of some kind connects two pins. This is typical of the way that motion detectors and door switches work. The input board has the GPIO pins pulled high and the external device will close a switch to connect the pin to ground.

The circuit uses an opto-isolator (sometimes called an opto-coupler) to provide protection to the GPIO pins. This is prudent since the inputs are connected to wires that run all over my house and anything could happen to put bad voltage onto those lines. I even went as far as having the opto-isolators in sockets so they could easily be replaced if they are blown. That's probably excessive, but it was easy enough to include, so I did.

Again, I used a GPIO extender. This time a MCP23017, which provides 16 GPIO pins with an I2C bus connection. Both of the extender chips I used will default to I2C bus address 0x20, so I set the address pins on this one so that it will appear on the bus at address 0x21. Note that A0 is tied high while A1 and A2 are tied low.

X10 Interface

X10 Interface


I control the X10 devices using a CM11A interface from ActiveHome. These haven't been made for a while now, but are still available on eBay. It connects via a serial port. NOTE: I had to swap send and receive from the original design of the Bus Hat to connect directly to the CM11A.

I have several X10 controllers for lighting as well as several wireless motion detectors that connect to X10 through a bridge device. These are convenient since they don't require running wires. The downside is that they use batteries. Fortunately, they are fairly efficient and only require replacing a few times a year.

Smart Phone Interface

Smart Phone User Interface


What home automation system would be complete without a smart phone app? A web interface is much more universally usable, so I went that route rather than writing a phone app. Besides, I'm an Android guy, but my other half uses an iPhone. I had no desire to go down that rabbit hole.

The web interface was created using Apache, PHP, and the socket interface to the alarm/automation system. The details on that will have to be a post of its own.


ThingSpeak API for Internet of Things

$
0
0
There is much hype about the "Internet of Things" and the Raspberry Pi is increasingly used as an IoT controller. To describe it simply - if you have a web site accessible from anywhere that displays data from a device and/or allows control of  that device - then you are part of the Internet of Things.

I have a smart thermostat that allows me to control my heating and cooling system remotely from a smart phone app. This is one of the most commonly used IoT devices. I also have created web interfaces to some of the Raspberry Pi controlled devices in my home - alarm system, lights, sprinklers, hot tub, weather station, security cameras.

I programmed these web interfaces myself, but there are much easier ways that are actually more secure, and these use the services that support the Internet of Things. One of the easiest to use is ThingSpeak.com. Here are the steps to use this service.

Go to the ThingSpeak web site and click on "Get Started." Click on "Sign Up" to create an account and then log in. Now you can create a new "Channel" which includes 1 to 8 fields of data. Once created, the channel is assigned an API_Key which is required to update the channel. You can see this value by clicking on the "API Keys" tab.

I have created a channel named "Example" with a single data field. Data can be uploaded to this field by using the following URL:

https://api.thingspeak.com/update?api_key=JPISWIDBF2CERG24&field1=123

(Yes, that is the actual API key. Feel free to post your own values, but try to keep them between 1-1000 so the chart is usable.)

You can view the public view here:  https://thingspeak.com/channels/67033

Note that you can only update once per minute using this method.

Examples in a couple dozen languages, including C and Python are available here:
https://thingspeak.com/docs/examples

Here is an example of real data - temperature and fermentation rate from my home-brewing system.


I decided to create my own API since I had all the necessary code already. This API requires the CURL library to handle the web access. To install this:
sudo apt-get update
sudo apt-get install libcurl4-openssl-dev

Here is the API that I created for updating two fields.
/***********************************************************************
Filename: thingspeak.c
send data to ThingSpeak IoT server

Uses libcurl to send the data via HTTP

13-Nov-2015 Ted Hale created

************************************************************************/

/* system includes */
#include <stdio.h>
#include <stdlib.h>
#include <stdarg.h>
#include <time.h>
#include <string.h>
#include <curl/curl.h>

// Note: this function can be replaced with printf if you like.
void Log(char *format, ... );

#define TRUE 1

// the URL structure to update ThingSpeak
// https://api.thingspeak.com/update?api_key=YOUR_CHANNEL_API_KEY&field1=7
char *URLtemplate = "https://api.thingspeak.com/update?api_key=%s&%s=%s&%s=%s";

// structure used by the libcurl write callback function
struct url_data {
size_t size;
char* data;
};

//=====================================================================
// write callback function needed by libCurl
size_t write_data(void *ptr, size_t size, size_t nmemb, struct url_data *data) {
size_t index = data->size;
size_t n = (size * nmemb);
char* tmp;

data->size += (size * nmemb);
tmp = realloc(data->data, data->size + 1); /* +1 for '\0' */

if(tmp) {
data->data = tmp;
} else {
if(data->data) {
free(data->data);
}
Log("wuthread> write_data Failed to allocate memory.\n");
return 0;
}

memcpy((data->data + index), ptr, n);
data->data[data->size] = '\0';

return size * nmemb;
}

//=====================================================================
// upload data to ThingSpeak
int UpdateThingSpeak(char *api_key, char *f1, char *v1, char *f2, char *v2)
{
int error = 1;
time_t now;
struct tm *dt;
char url[256];

CURL *curl;
CURLcode res;
struct url_data response;

time(&now);
dt = gmtime(&now);

// build the URL string
snprintf(url, sizeof(url)-1, URLtemplate, api_key, f1, v1, f2, v2);
// guarantee null termination of string
url[sizeof(url)-1] = 0;

Log("UpdateThingSpeak> send: [%s]",url);

curl = curl_easy_init();
if (curl) {
response.size = 0;
response.data = malloc(4096); /* reasonable size initial buffer */
response.data[0] = '\0';
curl_easy_setopt(curl, CURLOPT_URL, url);
curl_easy_setopt(curl, CURLOPT_CUSTOMREQUEST, "GET");
curl_easy_setopt(curl, CURLOPT_WRITEFUNCTION, write_data);
curl_easy_setopt(curl, CURLOPT_WRITEDATA, &response);
res = curl_easy_perform(curl);
if(res != CURLE_OK)
{
Log("UpdateThingSpeak> curl_easy_perform() failed: %s\n",curl_easy_strerror(res));
Log("URL is: [%s]",url);
error = 1;
} else {
// ThingSpeak returns "0" for error, else returns sample number
error = (strcmp(response.data,"0") == 0);
}
curl_easy_cleanup(curl);
free (response.data);
} else {
Log("UpdateThingSpeak> curl_easy_init failed\n");
error = 1;
}

return error;
}

Improved Hot Tub Controller

$
0
0
Hot Tub Controller Circuit Board
The original version of my hot tub controller starting having some problems which ended up being caused by an animal chewing through the control cables. I never liked having that huge bundle of cables running all the way across the back of the house, so I now have a new controller in a waterproof enclosure mounted right next to the hot tub.

The controller is built to mount on top of a Raspberry Pi and does the following:
   ●  Monitor the water temperature
   ●  Turn a circulation pump and heater on to heat the water as needed
   ●  Respond to buttons that increase/decrease the desired temperature
   ●  Respond to buttons that turn the water jets on and off
   ●  Display the current temperature
   ●  Detect various failure modes and place system in safe mode
   ●  Listen for commands from a smart phone app to control hot tub
   ●  Upload data periodically to an Internet of Things service

Temperature monitoring is performed by a waterproof DS18B20 from Adafruit. It uses a simple 1-wire bus to read the data.

The display, also from Adafruit, is a 7-segment LED display and is controlled using an I2C bus.

The device is powered by a 24V DC power supply since the relays on the hot tub are controlled by a 24V signal. A 5V step down regulator provides power to the Raspberry Pi.

Relay Control with LED Indicator
Transistors are used to control the relays and screw terminals provide the connections for all the wires.

The push buttons are connected to GPIO inputs which drive interrupts. These require "debounce" conditioning and this is explained in this post.


Smart Phone app for Hot Tub


The Internet of Things support is using ThingSpeak and the method is described in this post. You can see the live data at this URL.


The system also listens on a network socket for incoming commands from a smart phone app that allows me to monitor and control the hot tub remotely. It's actually not an app, rather just a web page designed for a mobile screen. This way it can easily be used by my Android, my wife or son's iPhone, or from any web browser.

Here is a video showing the completed controller in action. 


And, yes, I really do keep my hot tub that hot. One advantage of making my own controller is that I am not limited to 104 degrees max.

The Raspberry Pi version 3 is now Available

$
0
0
The latest version of the Pi is out and as expected, it has a faster CPU. Version 2 had a 900MHz Cortex-A7 chip. Version 3 has a 1.2GHz Cortex-A53. Still quad core and a little faster, but the big difference is that the A53 is a 64-bit processor where the A7 was 32-bit. We will have to wait for an OS upgrade to take advantage of that, but I doubt having 64-bit will make much difference for most applications.

The really great upgrade is that version 3 has built in wifi (802.11n) and Bluetooth.

I should be receiving one shortly and will let you know what I do with it.

Here is some information provided by RS-Components, a great source for all things Pi.

How to set up your Raspberry Pi 3


Comparison of Raspberry Pi 3 and the Raspberry Pi 2

Fancy another slice of pi? Find out more about the Raspberry Pi 3

Hot Tub Controller Details

$
0
0
By popular demand - some more details about my Hot Tub Controller project.

See the post about my Hot Tub Controller.

Controller Source Code
Can be found on github - https://github.com/tedhale/hottub.git
You can pull it from this address using the git command, or just go to this address and click the "Download Zip" button.

[Add web interface source files]


Partial parts list:
I will update this as I dig up the details for more of the parts I used.

Waterproof Case with clear cover - https://www.adafruit.com/products/905

7-Segment LCD (I2C bus) - https://www.adafruit.com/products/761
There are many colors and a couple sizes

Pushbuttons  - https://www.adafruit.com/products/481
Several colors available. They don't call these weatherproof but they seem to be pretty weather tolerant.

30A Relay (5V control) - http://www.mouser.com/Search/ProductDetail.aspx?R=JTN1AS-TMP-F-DC5V

10A Relay (5V control) - http://www.mouser.com/Search/ProductDetail.aspx?R=G5CA-1A-TP-E_DC5

Waterproof Enclosure - http://www.mouser.com/Search/ProductDetail.aspx?R=1554E2GY
for relays inside hot tub

Cable Gland (for running cable into waterproof box) - https://www.adafruit.com/products/761

2n2222 transistors

Terminal Blocks

Perf board

40 pin GPIO connector - https://www.adafruit.com/products/1979

Kano Kit

$
0
0
I recently received a Raspberry Pi 3 kit from Kano (kano.me) and thought I should give it a review.
The kit includes:
      ●  Raspberry Pi model 3
      ●  8GB microSD card preloaded with Kano OS, projects and games
      ●  Wireless keyboard with touchpad
      ●  Case with built-in speaker and LEDs
      ●  HDMI cable 
      ●  Power supply and cable
      ●  Wifi adapter
      ●  Illustrated user guide with stencils and stickers


The cost is $150 and as you would expect for that price, the quality is very good. I especially like the keyboard. Since this was a v3 Pi, the Wifi adapter was redundant, but that's OK - it will get used on another system. The documentation provides a detailed and illustrated, step by step guide to setting up the system, It is suitable for a very young user and that is obviously the target audience for this kit.

The cover to the case has a small speaker that doesn't appear to be amplified. There are, however, a couple of PCA9685 chips that are connected to the I2C bus and allow control of the LEDs using PWM. I will create some code to experiment with these and see what they're capable of. It would be really nice if the LEDs were RGB, but they appear to be simple blue LEDs.

Raspberry Pi vs Arduino

$
0
0
Oh My!  It has been over 4 months since my last post and some readers may be thinking that I have fallen off the planet. Not quite, but I have been very involved otherwise. Real life is intruding a lot lately and most of my hobby time has been absorbed in supporting the local maker group with teaching robotics to kids.

The robotics has gotten me very involved using Arduino systems which I had little experience with previously. That got me to thinking that a comparison of Arduino to Raspberry Pi would be good at this point.

Microcontroller vs General Purpose Computer

This is the big difference in the two. The Pi is a fully fledged general purpose computer capable of performing most of the tasks that a PC performs. It has a complete operating system, much more memory, a storage device, and a monitor and USB devices are supported. The Pi can easily multitask, running several programs at once. It also has excellent networking support, both wired and wireless.

The Arduino is a microcontroller. It has only a small amount of memory (2K RAM and 32K Flash) and runs a single program. This allows it to provide true real-time response. There is no USB support and adding networking is difficult and very limited. The advantage is that it starts up as soon as power is supplied and won’t be corrupted if power is lost. It also uses far less power and can easily run on batteries. An Arduino will happily run on 7-12 volts while the Pi must have a regulated 5V supply.

GPIO Capabilities

This is where the Arduino really shines. The Raspberry Pi provides 28 GPIO pins, but only one that provides PWM output and none that provide analog input. The typical Arduino also has 28 GPIO pins, but six of those can provide PWM output and another six can be analog inputs as well.

The Pi provides RS-232 as well as I2C, SPI, and 1-wire buses. The Arduino supports these as well.

Form Factors
Example Arduino Boards


If we ignore the original version of the Pi (which I tend to do now) there are only two form factors available – the model 2 and the zero.  The Arduino, however, is open-source, and comes in many sizes. The Uno is by far the most common, but my preferred version is the nano. I have also become quite fond of the ESP8226-01 Arduino compatible board. It may only have 2 GPIO pins, but it is extremely cheap, low power, and has built in wifi. I am starting to use it for IoT projects with great success.

Which to Choose

There is a fair amount of overlap in the capabilities of both systems, so many tasks could be performed by either device. However, there are some things that at best done with one or the other.

If you need:

  • More than 2KB of RAM
  • A very large program or multiple programs
  • A network interface that can handle multiple clients or support more than one protocol
Then you should use a Raspberry Pi.

If you need:

  • True real-time response to inputs
  • Analog inputs 
  • PWM output for motors or servos 
  • Extremely low cost solution
  • Battery powered

Then you should use an Arduino.

Yes, you can get analog input and PWM output on a raspberry Pi, but it requires additional hardware, which adds to the cost and complexity.

Sometimes you need the best of both worlds and will use a Pi and and Arduino. I have done this on one commercial project already and it worked very well.

Viewing all 60 articles
Browse latest View live